Sunday, May 29, 2011

Step 17.7 - Living Room Framing


It's time for the expansion of the living room and the new front entrance to be framed. There will be a peaked roof with craftsman details over the new windows and entrance. A fireplace and chimney will be in the southeast corner. The roof over the expansion area will tie into the existing roof in a way that is called a California roof.

Step 17.6 - Sheathing and Shear Panels

The stud work for the garage is completed and we can begin enclosing it. For the walls, this consists of shear panels made of oriented strand board (OSB) which is an engineered wood product that is as strong as plywood but somewhat less expensive. The purpose of shear panels is to give the wall additional strength and rigidity. OSB isn't the best looking material, but it will be totally covered up by drywall on the inside and siding on the outside.


For the roof, the sheathing is tongue-and-groove plywood. This same material is used for the floor of the loft. The plywood as well as the rafters will be visible from inside the garage so our plan is to paint it at a later time. Mark and his crew had to construct a temporary platform above the roof to hold the plywood until they are ready to lay it down.

Tuesday, May 24, 2011

Step 17.5 - Hoisting Beams with a Crane, Part 2


The second beam goes into the space above where the old windows and front door were. When the living room is expanded, this beam will be inside the room. It needs to be installed now where the front wall of the house used to be in order to hold up the roof structure. The crane didn't have to lift as high as the garage ridge beam, but it had to reach further from the street. The crane can extend to 50 ft. and it took all of that to get the beam where it was supposed to go. Once again, it was a perfect fit.

Before putting this beam in place it was routered and sanded. I did the sanding myself. This beam is 6x12 and 22 ft. long, which was a lot of sanding. I'm very pleased with the result.

There will be another beam of the same size in the living room, but that one is purely decorative. It won't be holding up anything, and it will be installed later.

Step 17. 5 - Hoisting Beams with a Crane, Part 1


The two biggest beams we have on this job are the ridge beam of the garage and the beam that goes over the old living room wall. They are both 6x12, very heavy, and they have to be lifted up and carefully placed in position. A crane is the only safe way to do that. Bob's Crane Service did the job for us.

Our street is very narrow and our site is very tight. There are overhead lines and a big pepper tree on one side, so it took a little jockeying by the driver to get his rig in position. The ridge beam went up first. It had been measured and cut very precisely so that it went right into place.

Step 17.4 - Starting on the Living Room

We are now ready to start working on the expansion of the living room. Mark and his crew started by building a false wall inside the living room. They lined it with plastic sheet to keep dust out.

Next the old windows and front door and all their surrounding framing came out.

The window and door headers were important structural elements helping to support the roof. With those headers gone, we need a big beam to go in their place. We also have a big ridge beam that needs to go into the top of the garage roof. To lift those beams into place we will need a crane, so that will be our next step.

Sunday, May 22, 2011

Step 17.3 - Framing Details

As framing continues, there are a multitude of details to be taken care of, aside from keeping everything straight and plumb. There is a big header that goes over the garage door. Instead of regular wood, this is an engineered beam which is less expensive. It isn't as attractive as a regular wood beam, but it will be covered up so the appearance doesn't matter.

Another detail is the 16 ft. high 8x8 post that will help support the ridge beam and roof of the garage. The length of the ridge beam is too great for a single piece of wood so the beam will be in two pieces. The post is positioned where the two pieces meet, and there is a big steel Simpson bucket to tie the two beams together. The post and the ridge beam will be visible for inside the garage, so they are good looking Douglas fir that has been routered and sanded to take off the square edges.

Since we are going for a Craftsman look on the exterior, there will be outriggers extending out from under the roof. These are notched, routered and sanded in the style of houses from 100 years ago.

Mark and his crew now have all the joists in place and have started laying down the plywood decking that will form the floor of the loft. The plywood is 3/8 in. tongue and groove that will form a smooth floor surface.


Tuesday, May 17, 2011

Step 17.2 - Rain


It's a fact of life that construction generally needs to stop when it rains. The workers are using power tools that are hazardous in wet conditions, and slippery surfaces would make a bad fall more likely.

We've had more than expected rain this year. Most of our rain comes in December and January, and most years the rains stop around the end of February or March. This year we have had 8 days of rain that interfered with work since the project started on Feb. 21. And more rain is expected tomorrow. That's pretty unusual for around here.

When it rains it's important to keep the lumber covered up as much as possible, and even more important to protect the parts of the house that are opened up. Plastic tarps are about the only way to go.

Step 17.1 - Joists

With the side walls up, we can begin to assemble the roof. The joists are the members that go horizontally between the two side walls. Usually these can be 2x4's or 2x6's, but in this case the joists are going to be the floor for a storage loft. To handle the extra weight load of the loft we are using I-joists that are an engineered wood product.

First the joist hangers are screwed into position, after careful measuring so that they line up with each other properly. Then a glob of a super strong adhesive is put on the bottom of the joist hanger. Finally, the joists are lifted up and pushed down into the hanger and nailed. Our garage will require 13 joists to support the loft. Mark and his crew got 9 of them installed yesterday.


Wednesday, May 11, 2011

Step 17 - Framing


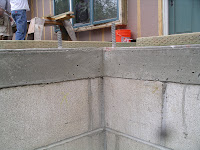
The slab that was poured five days ago is now cured enough for us to work on it. It sits on top of the retaining wall and ties together the garage and the house. The top of the slab is exactly the same elevation as the slab of the existing house, so there will be no bumps or ledges between the old floor and the new.

Our first task was to install the sill plates (pressure-treated 2x4's). They are drilled to fit over the anchor bolts that are anchored in the concrete. Then they are fastened down with 5/8 inch nuts that are tightened with an impact wrench.

While that was being done, Al started measuring and marking all the 2x4's and 4x4's that will make up the framing. Al's markings show where each piece goes so there is no confusion once the nailing starts. John stripped the siding off the front of the house in preparation for the later removal of that wall, installation of new beams, and construction of the new living room wall.

The garage is going to be extra tall to include the storage loft that we want. From the current base of the garage, the walls are almost 12 ft. high. They won't be that high when it is finished because the concrete floor will be about 14 inches higher than the present dirt floor. However, the concrete floor won't be poured until after the framing is done. So for now, scaffolding is needed to allow the guys to get up to the top plate of the walls. By the end of the day Mark, Al and John had framed the north and south side walls of the garage. Now the real size and shape of the project are starting to become visible.