Wednesday, April 27, 2011
Step 13 - Preparing to Backfill
All of the area outside the wall must be backfilled before the next steps of construction can proceed. We are going to backfill with gravel and some leftover broken concrete block. Miguel Gomez delivered the gravel from RCP and placed it in the center of the new garage where he can use his bobcat to pick it up and dump it over the wall.
However, before we can backfill we have to apply waterproofing to the outside of the wall and we have to install a french drain. It will take a couple of days to do that work, so for now we are just stockpiling the gravel for later use.
The waterproofing material is like a cross between paint and tar. It is applied with a roller like paint, but it is incredibly sticky and messy. It's good to wear some protection so you don't get it all over yourself. Several coats must be applied to get good, even coverage of the block wall, and all the little cracks and crevices must be thoroughly filled. Mark says you only get one chance to do this so you better do it right.
Step 12 - Grouting the Retaining Wall
Our second concrete pour was very much like the first, but faster. We only needed about 3 yards of concrete, so a smaller mixer was sent. Mark Kennedy did the pumping again. The purpose of grouting is to fill all the blocks of the wall from bottom to top with concrete. The pictures show Mark Kennedy aiming the hose down into the block as the concrete is pumped in. Al Frazer filled in some of the low spots by hand from a bucket. Mike Rossi did the trowel work to get the top smooth and to clean up the spills.
Some rebar is left sticking out where it will go into other concrete that will be poured later. While the concrete was still wet but starting to firm up, Mark Stanfield and Al placed threaded anchor bolts into the top of the blocks. When it is time to start the framing, the bottom plate (a pressure treated piece of lumber) will be secured to the top of the retaining wall with nuts and washers. But that's later. For now the concrete just has to dry and harden a few days before we move on to the next steps. Concrete reaches 90% of its maximum hardness after 7 days and we don't want to risk damaging it before then.
Step 11 - Building the Retaining Wall
Not every project will require a retaining wall. In our case it is necessary because we did all that grading to lower the floor level of the new garage. This means that the bottom 3 feet of the garage wall will be below the surrounding grade of the front yard. A concrete wall is required to hold the dirt back. Mike Rossi is our masonry expert, assisted by Sam and James.
The first step was getting the block delivered from RCP. Next, Mike and Sam laid out precise marking lines to indicate where the blocks will go. It's critically important for the blocks to line up with the vertical rebar so that the rebar ends up inside the cells of the blocks. They began laying blocks on the corners and then filled in to complete the first row. Our design called for 8 inch wide blocks on the first row and 6 inch wide blocks after that which was a little trickier to do. The blocks are put together with mortar which is like concrete but has no rock in it so it's not as strong. Its purpose is to hold the block together until it can be filled with concrete. The mortar was mixed on site in a small electric mixer.
After the first row was done they began building up the corners to the top level. Then they filled in the rest. In about 3 days it was all done, but at that point the blocks are hollow and only held together by the mortar. We can't fill them with concrete (grout) until the wall is inspected again.
Inspector Steve came the next day and gave the okay to grout the block. Mark called both Superior and Kennedy pumping to schedule a pour for the following day.
Step 10 - Pouring the Footing
With approval by the inspector, we can proceed to pour concrete for the footing. Mark Stanfield estimated that we would need about 12 cubic yards. The big concrete mixer trucks hold 10 yards, so we would need two deliveries. Our concrete comes from Superior Ready Mix. Mark Kennedy handled the pumping duties. The photos show how the concrete comes out of the truck and into the hopper, then into the hose and into the trench.
Some of the vertical rebar and threaded anchors need to be held in place while the concrete is poured so they remain perfectly upright.
Once the concrete is in the ground, most of the form boards can be removed and the surface of the concrete can be smoothed. It needs to be smooth because a concrete block retaining wall is going to be built on top of it and the concrete blocks need a flat surface under them. Mike Rossi who will be building the retaining wall did a lot of the smoothing of the concrete surface.
In order to keep the concrete mess out of the street, we converted our erosion control pit to a washout pit. That's where all the tools are washed and small amounts of excess concrete are tossed. When it dries out a bit, we shovel it out and let it dry before hauling it to the dump.
Tuesday, April 26, 2011
Step 9 - Putting Steel in the Footing
A really key element in the strength of a foundation is the amount of steel reinforcing rod (rebar) that is used. Our engineer calculated how much we would need for this job, and it is a lot. The corners have more rebar in them to give them added strength.
I have included a lot of pictures here to show the scope and complexity of the rebar installation. We used 3 different diameters in different locations - 3/8 inch, 1/2 inch, and 5/8 inch. We also used some 3 ft. long threaded rods (called all-threads) in a couple of key locations.
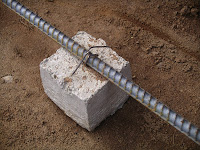
The small concrete blocks are called dobies and they hold the rebar off the ground so that when the concrete is poured the rebar will be in the middle of it. All of the rebar is secured together with wire so that it becomes virtually one solid unit. There are also a lot of wood form boards to help hold everything in place until the concrete is poured.
When all the rebar was in place, the vertical rods were capped with those orange plastic things to prevent anyone from being impaled on one. This has happened a few times in the past, so the caps are really important for safety.
The last step in this phase is inspection of the trenching and rebar by the city's building inspector. Our inspector (Steve) gave us the green light to pour the concrete.
Subscribe to:
Posts (Atom)